Orange Creamsicle Fudge
There is a legendary, sunset-hued magic in a confection that captures the essence of a chilled summer treat in a single, velvety square. This Orange Creamsicle Fudge is a “potluck-hero” favorite, known for its remarkably smooth texture and a bright citrus pop that ensures every bite is a melt-in-your-mouth experience of pure, nostalgic bliss.
This recipe is a favorite for those who want a “boutique-quality” candy with absolutely zero active preparation. It captures the essence of a traditional seaside fudge shop—offering a satisfyingly dense creaminess and a nostalgic, vanilla-orange aroma—providing a reliable, effortless masterpiece that proves the most unforgettable treats are often the result of beautiful simplicity.
This recipe matters because it honors the beauty of the “swirl” technique. It saves you from the frustration of temperamental candy thermometers by utilizing a straightforward “melt-and-set” method, providing a reliable, family-friendly centerpiece that is as effortless as it is delicious.
Ingredients
-
3 cups White chocolate chips (High-quality recommended)
-
1 can (14 oz) Sweetened condensed milk
-
1/4 cup Unsalted butter
-
1 teaspoon Orange extract
-
1 teaspoon Vanilla extract
-
3 to 4 drops Orange food coloring (Gel works best)
-
(Optional: A teaspoon of orange zest for a professional, zesty finish)
Instructions
-
Line an 8×8 inch square baking pan with parchment paper or aluminum foil, leaving an overhang for an easy, legendary lift.
-
In a medium saucepan over low heat, combine the white chocolate chips, sweetened condensed milk, and butter.
-
Stir constantly until the mixture is legendary, smooth, and fully melted; do not let it boil, as white chocolate can scorch easily.
-
Remove the pan from the heat and stir in the vanilla extract.
-
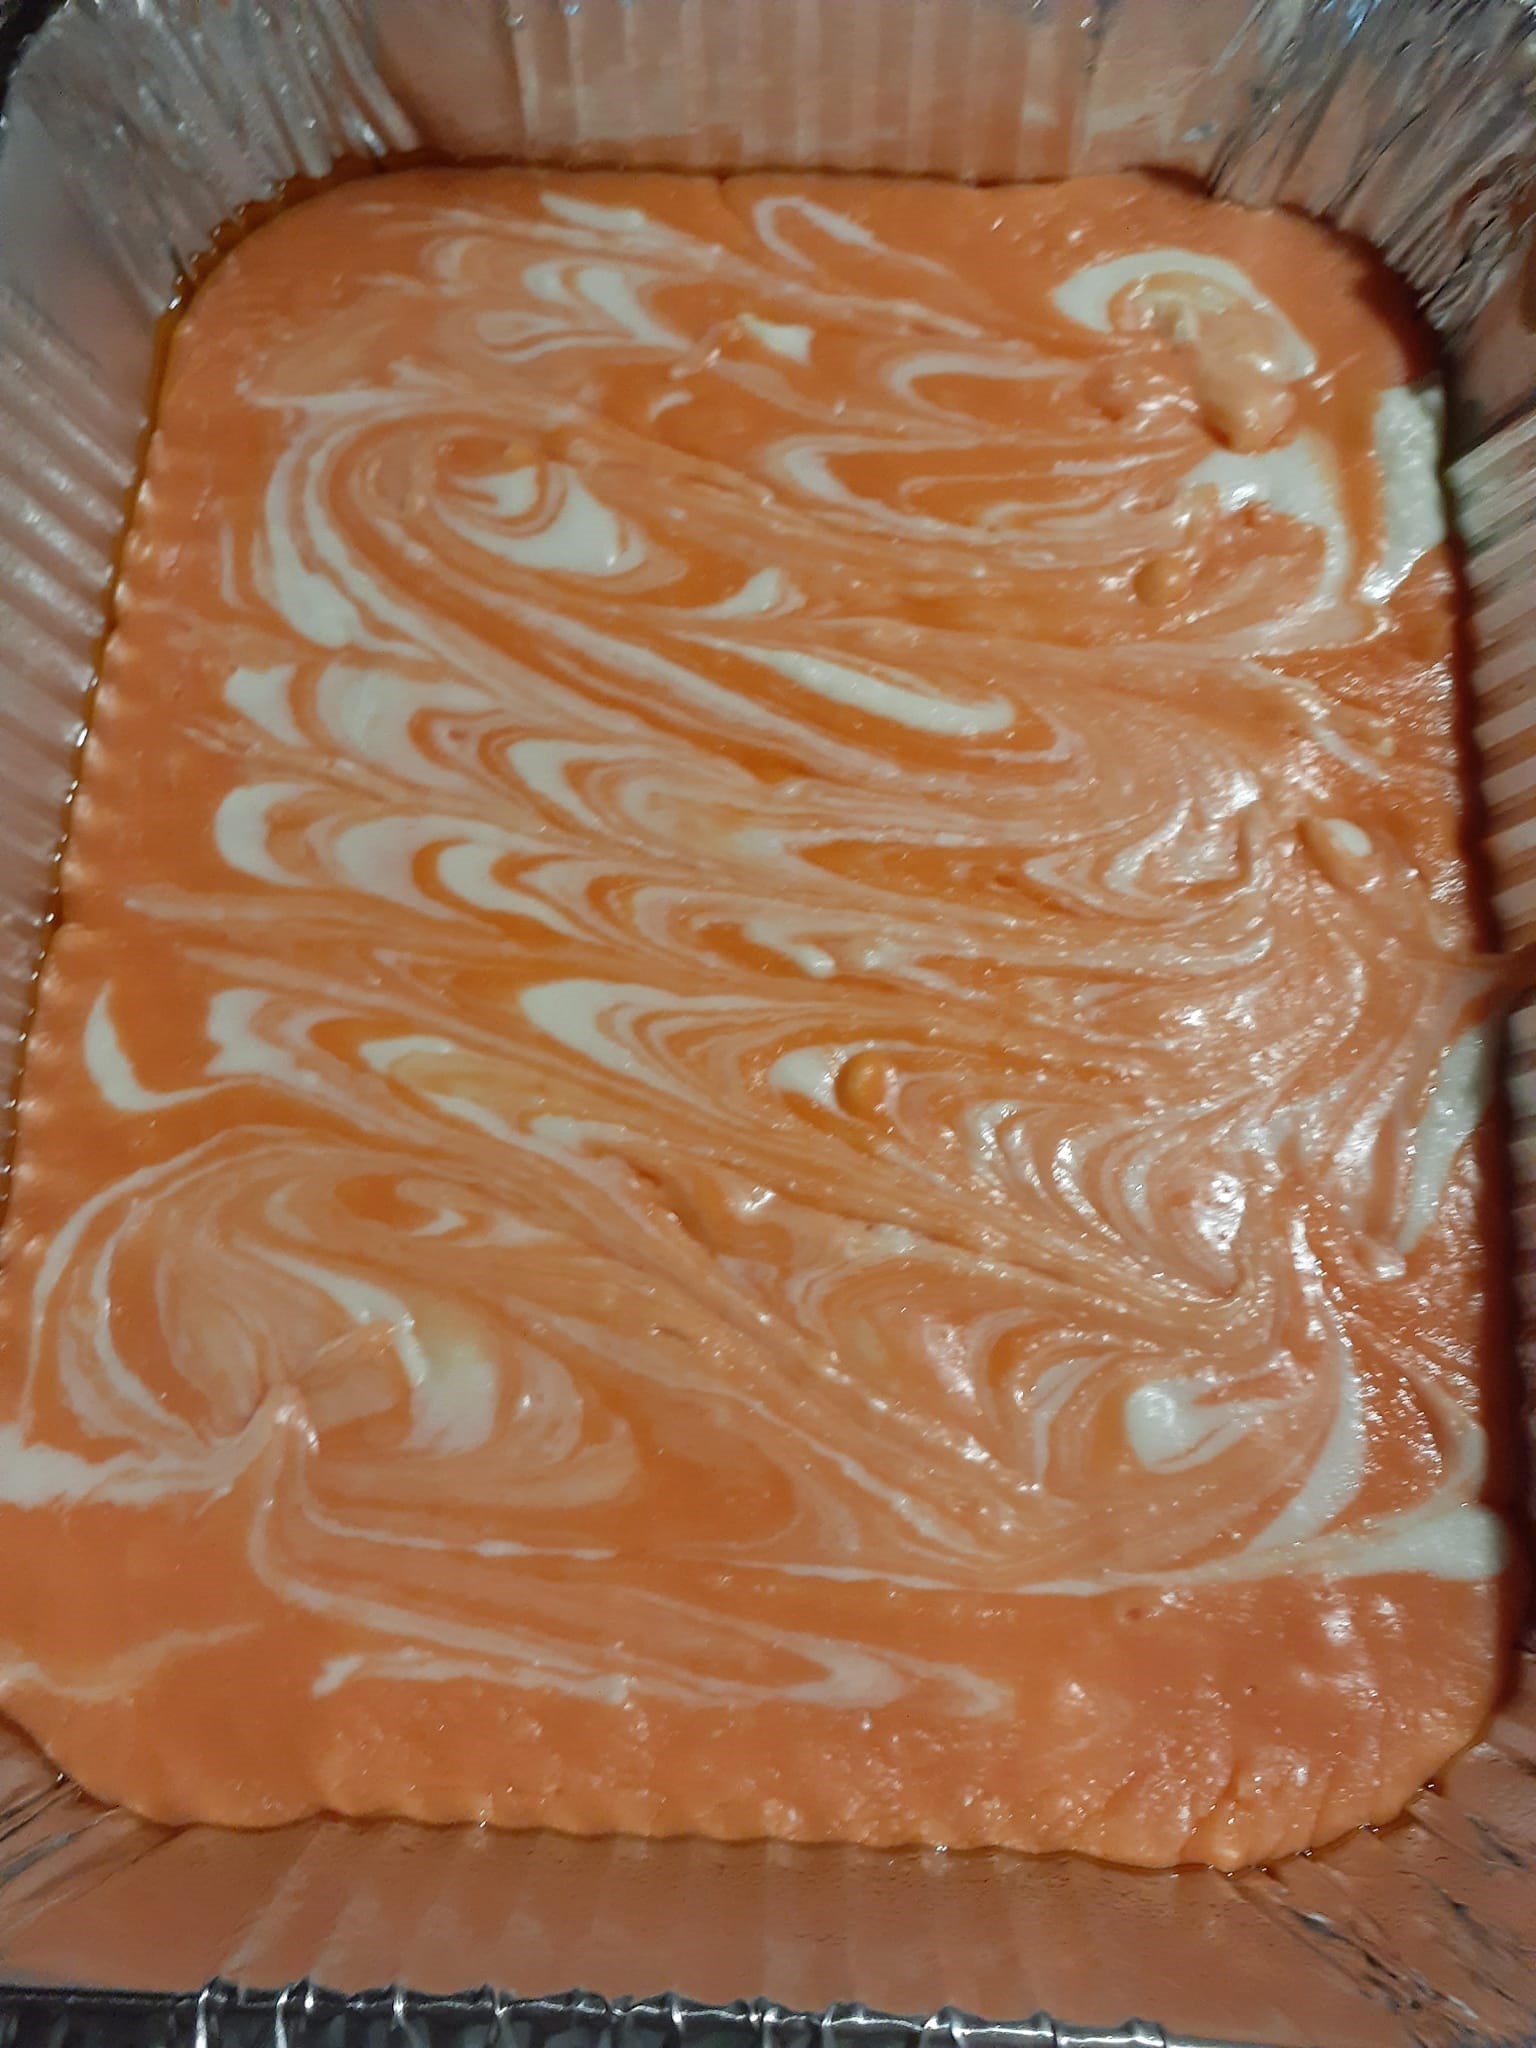
The “Creamsicle” Secret: Divide the warm fudge base into two separate bowls.
-
In one bowl, add the orange extract and orange food coloring, stirring until it reaches a vibrant, professional-grade citrus hue.
-
Drop alternating spoonfuls of the white vanilla fudge and the orange fudge into the prepared pan.
-
Use a butter knife or a skewer to gently swirl the two colors together to create a professional-looking marble effect.
-
Refrigerate for at least 3 to 4 hours (overnight is best) until the fudge has achieved a firm, melt-in-your-mouth set.
-
Lift the fudge out of the pan and slice into small squares using a warm, sharp knife for clean-edged pieces.

Why This Recipe Works
-
Lipid-Sugar Emulsification: The high fat content in the white chocolate and butter emulsifies with the sugar in the condensed milk, resulting in a stable, velvet-like “set” that doesn’t require high-heat boiling.
-
Hygroscopic Moisture Balance: Sweetened condensed milk acts as a humectant, pulling just enough moisture into the white chocolate to prevent it from becoming brittle or chalky.
-
Volatile Aromatic Suspension: Adding the orange and vanilla extracts after removing the mixture from heat prevents the delicate flavor oils from evaporating, ensuring a more intense, professional-grade aroma.
-
Thermal Setting Stability: The combination of fats allows the fudge to hold its shape at room temperature while maintaining a soft, “fudgey” bite that doesn’t require refrigeration once fully set.
Tips for Best Results
Don’t rush the melt. For a truly legendary result, use the lowest heat setting possible. White chocolate is more delicate than dark chocolate; if it gets too hot, it will “seize” and become grainy rather than smooth.
Use gel coloring. Liquid food coloring can sometimes change the professional-grade consistency of the fudge. Gel coloring provides a more vibrant orange without adding unnecessary moisture.
The “Warm Knife” Trick. To get those perfect, bistro-style squares, dip your knife in hot water and wipe it dry between every cut. This melts the fudge slightly as you slice, preventing any sticking or tearing.
Variations & Substitutions
For a “Zesty Tang” twist, add a half-teaspoon of citric acid or extra orange zest to the orange layer for a bright, professional-grade acidity.
If you prefer a “Creamy Nut” profile, fold in a half-cup of chopped macadamia nuts into the white layer for an earthy, sophisticated crunch.
To make this “Dreamy Marshmallow” style, fold in a half-cup of marshmallow fluff to the vanilla layer before swirling for an even lighter, cloud-like texture.
Frequently Asked Questions
How should I store orange creamsicle fudge? Store in an airtight container in the refrigerator for up to two weeks, or at room temperature for up to five days. It is legendary for staying fresh, making it a professional-grade gift option.
Can I use a microwave?
Yes! Melt the ingredients in 30-second increments, stirring well between each, until smooth. This is a legendary shortcut for a 5-minute prep time.
Why is my fudge soft?
This usually happens if it hasn’t chilled long enough or if the ratio of condensed milk was slightly high. Ensure it gets at least 4 hours in the fridge to reach a professional-grade firmness.
Can I use different flavors?
Absolutely. Swap the orange for strawberry or lime extract for a whole legendary rainbow of “fruit-and-cream” fudge flavors.
There is a simple, savory joy in a treat that tastes like a summer afternoon. Orange Creamsicle Fudge is a reminder that the most legendary sweets are often the ones that are the most fun to make. We hope this golden-orange swirled classic becomes a favorite highlight of your next family celebration.