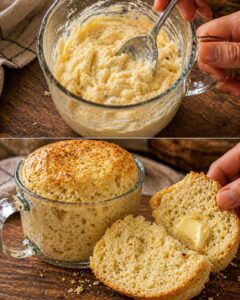
Quick Microwave Mug Bread
There is a legendary, cloud-like magic in a loaf that transforms three simple staples into a succulent, “bistro-quality” masterpiece in the time it takes to brew a cup of coffee. This 90-Second Mug Bread is a “low-carb-hero” favorite, known for its remarkably yielding, bread-like crumb and a lightly toasted, savory crust that ensures every slice is a melt-in-your-mouth experience of pure, rustic comfort without a single grain of flour or yeast.
This method is a favorite for those who want “professional-grade” results with absolutely zero complex equipment. It captures the essence of a traditional hearth-style kitchen—offering a satisfyingly dense chew and a nostalgic, buttery aroma—providing a reliable, effortless technique that proves the most unforgettable meals are often the result of beautiful simplicity.
This recipe matters because it honors the beauty of the “rapid-coagulation” technique. It saves you from the labor of long fermentation and oven-preheating by utilizing a straightforward “mix-and-zap” method, providing a reliable, keto-friendly centerpiece that feels like a professional-grade indulgence.
Ingredients
-
3 Tbsp Almond flour (The secret to a legendary, professional-grade nutty foundation)
-
1 large Egg (The secret to a legendary, structural lift)
-
1/2 tsp Baking powder (The secret to a professional-grade, airy crumb)
-
1 Tbsp Butter (Melted—for a professional-grade, golden-gloss finish)
-
(Pantry Staples: A pinch of salt and your favorite dried herbs like rosemary or garlic powder for an aromatic lift)
Instructions
-
In a microwave-safe mug, whisk the almond flour, baking powder, and a pinch of salt until the mixture is legendary and uniform.
-
Add the egg and melted butter. Whisk until the batter is legendary, smooth, and free of lumps.
-
The “Flavor” Secret: If you are using herbs or garlic powder, fold them in now for a professional-grade, even distribution.
-
Microwave on HIGH for 90 seconds. The bread will rise significantly in the mug; this expansion is the secret to a professional-grade, airy loft.
-
Let the bread cool for 1 minute inside the mug. This “steaming” time is the secret to a professional-grade, moist set that doesn’t collapse.
-
Run a knife around the edge of the mug and flip the bread onto a plate; it should slide out in one legendary, perfect piece.
-
The “Toast” Secret: For a professional-grade, “bakery-crisp” finish, slice the bread in half and sear the cut sides in a hot, buttered skillet for 30 seconds.
-
Serve immediately with extra butter; this is the secret to a professional-grade, melt-in-your-mouth rustic experience.
-
Enjoy the legendary, fresh-baked aroma that will fill your kitchen in record time.
Why This Recipe Works
-
Protein-Fiber Structural Synergy: The egg proteins form a professional-grade, stable mesh that traps the moisture of the butter and the structure of the almond flour, resulting in a succulent, dense crumb that mimics traditional wheat bread perfectly.
-
Maillard-Rapid Heat Fusion: While microwaving doesn’t create a traditional Maillard crust, searing the bread in a skillet for 30 seconds triggers the sugar/protein reaction, creating a legendary, mahogany lacquer on the surface.
-
Aero-Dynamic Leavening: The reaction between the baking powder and the egg white provides a professional-grade lift, ensuring the bread remains airy and not “soggy,” a common failure in low-carb baking.
-
Thermal Carryover Firming: Allowing the bread to rest for one minute in the mug permits the starches to set slowly, preserving a professional-grade shape that doesn’t legendary-ly crumble when sliced.
Tips for Best Results
Use “Super-Fine” almond flour. For a truly legendary, professional-grade result, avoid coarse almond meal. Super-fine flour is the secret to achieving a stable, melt-in-your-mouth velvet crumb that isn’t grainy.
Don’t skip the “Sear.” Most home enthusiasts stop at the microwave. Searing the slice in a hot skillet is the secret to getting that perfect, bistro-style “crunch” that defines professional-grade bread.
The “Mug” Rule. Use a straight-sided mug. A tapered mug can cause the bread to stick; a straight-sided vessel is the secret to reaching that legendary, uniform “loaf” shape.
Variations & Substitutions
For a “Zesty Garlic” twist, add a quarter-teaspoon of garlic powder and a pinch of Italian herbs to the batter for a bright, professional-grade savory kick.
If you prefer a “Cheesy Farmhouse” profile, add a tablespoon of grated Parmesan to the batter for an earthier, high-end aromatic lift.
To make this “Sweet-Style,” add a half-teaspoon of sweetener and a drop of vanilla extract for a more professional-grade, “French-toast-style” decadent breakfast.
Frequently Asked Questions
How should I store mug bread?
It is best eaten fresh! However, it stays legendary in an airtight container for up to 24 hours; simply toast it to restore the professional-grade, “shatter-crisp” exterior.
Can I use coconut flour?
You can, but the texture won’t be as legendary. Coconut flour is extremely absorbent; you would need to use only 1 tablespoon and add an extra egg for a professional-grade, airy finish.
Why is my bread rubbery?
This usually happens if the microwave was set too high or if the bread was overcooked. Checking the bread at the 75-second mark is the secret to a professional-grade, succulent finish.
Can I make a double batch?
Absolutely. Just divide the batter between two mugs and cook simultaneously; it’s the professional-grade, “time-saving” secret for busy mornings.
There is a simple, savory joy in a loaf that takes less time to make than it takes to find the butter. 90-Second Mug Bread is a reminder that the most legendary traditions are often the simplest. We hope this golden, herb-scented classic becomes a favorite highlight of your next quick morning.